www.photozone.de/m43/961_ol...
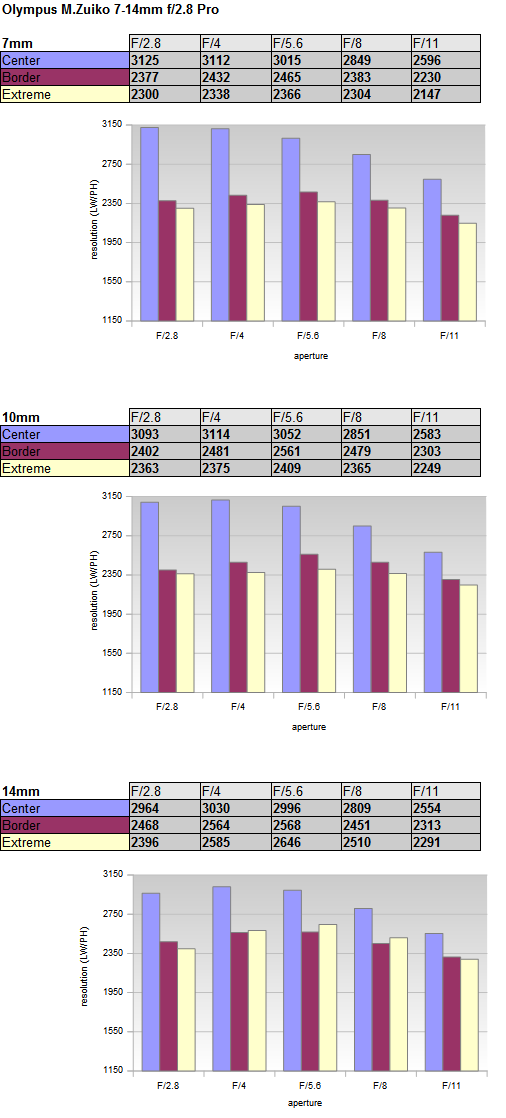
초점평면상의 MTF값 :

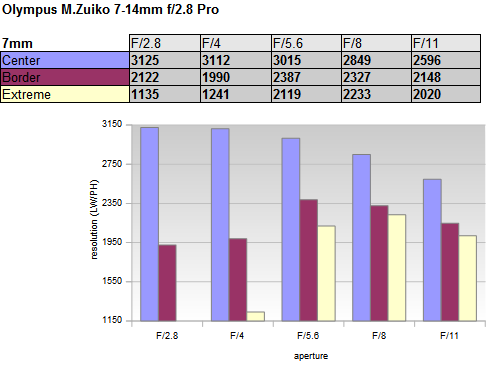
7mm에서의 상면만곡 :
Testing the effects of field curvature is notoriously unreliable so take the following with a grain of salt. In the previous chapter we illustrated the MTFs when following the field curvature across the image field. In this chapter we analyse the flat field reproduction at 7mm. The field curvature is, of course, most obvious at fully open aperture - essentially we are documenting the related local out-of-focus effects here. The center quality remains identical, of course, but the corner quality falls completely apart at f/2.8 and f/4. The increased depth-of-field catches up at f/5.6 although the max MTFs on the actual focus field cannot be reached even at f/8.
상면만곡을 MTF차트로 테스트하는 것은 아주 대단히 굉장히 신뢰성 없으므로, 적당히 들어라. 초점면이 아닌 평면에 대한 MTF 촬영을 진행하면 이 렌즈의 광각단에서 상면만곡이 얼마나 강한지를 볼 수 있다. 당연히 상면만곡의 효과는 최대개방에서 가장 강하다. (사실 우리는 관련된 out-of-focus 효과에 대한 글을 쓰고 있기도 하다) 중앙부 해상력은 당연히 유지되지만, 주변부 화질은 f/2.8과 f/4에서 확연히 떨어져 보인다. 조리개를 조일수록 심도가 깊어지므로 f/5.6에서는 주변부가 상당히 회복되지만, f/8까지도 주변부 화질을 100% 회복하지 못하고 있다.
Now what does this mean in the real life rather than in the lab ? For best performance (edge to edge sharpness in an "infinity" scene) you should stop down to f/8 and pull the focus slightly towards you (towards closer focus distance). This will pull the corners into focus.
그러니까 이것이 테스트 차트가 아닌 실제 사용에서 무엇을 의미하는가? 최대한의 성능을 내기 위해서는 (무한대 촬영에서 화면 끝부터 끝까지 샤프한 결과를 얻으려면) 조리개를 f/8까지 조이고 초점을 약간 촬영자 쪽으로 (약간 가까운 쪽으로) 당겨야 한다. 이렇게 하면 주변부가 피사계심도 영역에 들어올 것이다.

결론 :
Optical Quality
Mechanical Quality
Price/Performance
The Olympus M.Zuiko 7-14mm f/2.8 PRO left a bit of a mixed impression. Actually prior of this test I took it on vacation but the results were a bit short of my expectation - primarily because of the field curvature issue at 7mm which I didn't know about at the time. When keeping the field curvature in mind and act accordingly, you can certainly achieve very good results. The center quality is breathtaking whereas the outer image region has be handled with care when shooting below 10mm at least (pull the focus a bit). Image distortions aren't relevant from a user perspective. That being said it is also obvious that the auto-correction comes at the price of a bit of softness - it is simply not lossless. Vignetting as well as lateral CAs are a lesser concern. Despite its immense front element it is also worth to emphasize that the M.Zuiko is surprisingly flare-resistant (relative to others in this class).
올림 7-14/2.8 PRO에 대한 본인의 인상은 다소 모호하다. 사실 테스트를 벌이기 전에 휴가를 가면서 이 렌즈를 가져갔고, 결과물은 예상보다 좋지 않았다. 그 때는 이 렌즈가 광각단에서 상면만곡이 있다는 것을 몰랐기 때문이다. 물론 이 특성을 알고 적절히 대응하면 매우 좋은 결과물을 얻을 수 있다. 10mm 미만에서 촬영할 때 주변부를 신경써서 초점을 조작해야 한다는 점에도 불구하고 중앙부 화질은 매우 좋으며 사용자 입장에서 왜곡은 신경쓰이지 않는다. 물론 전자식 왜곡보정이 샤프함을 손상시키는 점은 분명하다. - 이는 무손실 보정이 아니니까. 비네팅이나 색수차는 별로 중요하지 않은 문제이다. 또한 대물렌즈가 거대함에도 불구하고 7-14/2.8이 초광각 줌렌즈들 중에서 플레어에 매우 강하다는 점도 강조해야겠다.
In terms of build quality, the Olympus is up there with the very best and it's a joy to use in the real life. The noiseless and fast AF are something we got used to in the Olympus universe but it's worth to mention nonetheless.
만듦새 면에서 이 올림푸스 렌즈는 매우 훌륭하며 사용하면서 즐거운 점 중 하나이다. 조용하고 빠른 AF는 올림푸스 제품들에서 매우 일반적이지만 역시 언급해야 되겠다.
At the end of the day, there is, of course, the big question whether to prefer the Olympus M.Zuiko 7-14mm f/2.8 PRO over the Panasonic Lumix G 7-14mm f/4 ASPH. The Olympus lens is obviously faster so if low light shooting is your thing, this is obviously already the answer. However, in my case the Panasonic lens will remain in my stock because of its smaller size and better field curvature.
물론 파나소닉의 7-14/4와 올림푸스 7-14/2.8 중에 어떤 것을 골라야 하느냐는 질문이 남는다. 당연히 어두운 곳에서 촬영할 때는 한 스탑 빠른 올림푸스 렌즈가 좋겠지만, 본인은 파나소닉 렌즈의 더 작은 크기와 훨씬 나은 상면만곡 특성 때문에 그 렌즈를 계속 가지고 있을 것이다.
____
광각단 상면만곡이 굉장한 렌즈인데 그것치고 화질 평점이 과분합니다. 다른 PRO들보다 낮긴 하지만요.
F2.8 때문에 많은 걸 포기한 느낌이랄까.... Photozone도 요즘 리뷰 물렁하게 하네요.
 덧글 21 접기
 탈퇴한 회원
[lunic*]말씀하신대로 최저점이 0 이 아니군요.
 탈퇴한 회원
[해외이주노동자]화질 면에서는 실사용시 올림푸스 7-14 PRO가 명백히 더 좋습니다.
 탈퇴한 회원
[아립] 초광각에서 F2.8의 메리트가 없을지라도 메이커로서는 "대삼원을 갖추어야 한다"라는 중요한 문제가 있습니다.
 탈퇴한 회원
[해외이주노동자] 그리고, 파나소닉 7-14보다 올림푸스 7-14 쪽이 마이크로콘트라스트가 더 좋고, 그라데이션이 더 자연스럽게 나옵니다. 저런 테스트에서는 그런 부분은 거의 다뤄지지 않지요.
2015-11-06 22:02

회원정보
아이디 : ahsspecail9***
닉네임 : another-세상
포인트 : 44354 점
레 벨 : 우수회원(레벨 : 7)
가입일 : 2015-05-11 07:03
포토앨범보기 쪽지보내기